[오픈 API] 앱 다운로드 순위를 가져오자 3부 (모바일앱 구현)
- [오픈 API] 앱 다운로드 순위를 가져오자 1부 (AppApnnie Api)
- [오픈 API] 앱 다운로드 순위를 가져오자 2부 (모바일 앱 설계)
- [오픈 API] 앱 다운로드 순위를 가져오자 3부 (모바일 앱 구현)
마지막 시간으로 지난시간에 설계한 부분을 구현하도록 하겠습니다.
- BaseViewController 생성
- AuthViewController 클래스
- ProductViewController 클래스
- SalesViewController 클래스
==============================================================================1. BaseViewController는 ViewController에서 자주 사용할 함수들을 정의할 부모 컨트롤러 입니다.
API를 http로 호출하고 받는 함수들을 정의하면, 각각의 ViewController에서 구현하지 않아도 됩니다.
- requestUrlGet() : AFNetworking를 이용하여, get방식으로 호출하는 함수입니다.
- receiveAPI() : AFNetworking를 이용하여, get방식으로 호출한 후 받는 함수 입니다.
- requestUrlGet 함수에서 파라미터와 주소를 호출하면, 받은 결과를 노티피케이션 객체를 생성, 등록하고, receiveAPI에 노티피케이션 객체를 해지해줍니다.
=============================================================================
- (void)requestUrlGet:(NSString*)urlString parameters:(NSDictionary*)parameters className:(NSString*)className apiName:(NSString*)apiName
{
[[NSNotificationCenter defaultCenter] addObserver:self selector:@selector(receiveAPI:) name:apiName object:nil];
AFHTTPSessionManager *manager = [[AFHTTPSessionManager alloc]initWithSessionConfiguration:[NSURLSessionConfiguration defaultSessionConfiguration]];
manager.requestSerializer = [AFJSONRequestSerializer serializer];
[manager.requestSerializer setTimeoutInterval:10];
[manager.requestSerializer setValue:@"application/json" forHTTPHeaderField:@"Content-Type"];
[manager.requestSerializer setValue:APPANNIE_API_KEY forHTTPHeaderField:@"Authorization"];
NSLog(@"urlString = %@",urlString);
[manager GET:urlString parameters:parameters progress:nil success:^(NSURLSessionDataTask * _Nonnull task, id _Nullable responseObject) {
NSLog(@"responseObject = %@",responseObject);
[[NSNotificationCenter defaultCenter] postNotificationName:apiName object:nil userInfo:responseObject];
} failure:^(NSURLSessionDataTask * _Nullable task, NSError * _Nonnull error) {
NSLog(@"error: %@", error.description);
[[NSNotificationCenter defaultCenter] removeObserver:self name:apiName object:nil];
}];
}
#pragma mark - receiveAPI
- (void)receiveAPI:(NSNotification*)notification
{
[[NSNotificationCenter defaultCenter] removeObserver:self name:notification.name object:nil];
}
=============================================================================
2. AuthViewController 에서는 account_id를 얻기 위해, APPANNIE_API_KEY을 이용하여, API를 호출하고, 받은 결과를 authModel 모델에 넣습니다. UI는 UITableView를 이용하여, 받은 결과를 보여주며, 테이블에서 선택한 account_id를 ProductViewController로 넘겨줍니다.
- reqData() : 검색버튼을 누르면 호출되는 함수로, URL를 요청합니다.
- receiveAPI() : URL로 요청해서 받은 결과를 받는 함수로, authModel를 넣어주고, 테이블을 새로고침 합니다.
- nextAtcion() : 테이블에서 선택했을때 선택된 index정보로, 배열의 authModel객체의 account_id를 ProductViewController로 넘겨줍니다.
=============================================================================
- (void)reqData
{
[self requestUrlGet:AUTH_API(@"0") parameters:nil className:NSStringFromClass(self.class) apiName:@"AUTH_API"];
}
- (void)receiveAPI:(NSNotification *)notification
{
[super receiveAPI:notification];
self.m_authArray=[AuthModel mj_objectArrayWithKeyValuesArray:notification.userInfo[@"accounts"]];
[m_authTableView reloadData];
}
#pragma mark - UITableViewDataSource
- (NSInteger)tableView:(UITableView *)tableView numberOfRowsInSection:(NSInteger)section
{
return [self.m_authArray count];
}
- (UITableViewCell *)tableView:(UITableView *)tableView cellForRowAtIndexPath:(NSIndexPath *)indexPath
{
static NSString *CellIdentifier =@"AuthCell";
UITableViewCell *cell = [tableView dequeueReusableCellWithIdentifier:CellIdentifier forIndexPath:indexPath];
AuthModel * authModel =[self.m_authArray objectAtIndex:indexPath.row];
[cell.textLabel setText:[NSString stringWithFormat:@"%@ (%@)", authModel.account_name, authModel.market]];
return cell;
}
-(void)nextAtcion:(NSInteger)index
{
ProductViewController *productViewController =[self.storyboard instantiateViewControllerWithIdentifier:@"ProductViewController"];
AuthModel * authModel =[self.m_authArray objectAtIndex:indexPath.row];
productViewController.m_AuthModel =authModel;
[self.navigationController pushViewController:productViewController animated:YES];
}
=============================================================================
3. ProductViewController 에서는 product_id를 얻기 위해, account_id을 이용하여, API를 호출하고, 받은 결과를 Product 모델에 넣습니다. UI는 UITableView를 이용하여, 받은 결과를 보여주며, 테이블에서 선택한 product_id와 account_id그전에 얻은 SalesViewController로 넘겨줍니다.
- reqData() : 검색버튼을 누르면 호출되는 함수로, URL를 요청합니다.
- receiveAPI() : URL로 요청해서 받은 결과를 받는 함수로, ProductModel를 넣어주고, 테이블을 새로고침 합니다.
- nextAtcion() : 테이블에서 선택했을때 선택된 index정보로, 배열의 ProductModel 객체의 product_id와 account_id를 SalesViewController로 넘겨줍니다.
=============================================================================
- (void)reqData
{
[self requestUrlGet:PRODUCTS_API(self.m_AuthModel.account_id, @"0") parameters:nil className:NSStringFromClass(self.class) apiName:@"PRODUCTS_API"];
}
- (void)receiveAPI:(NSNotification *)notification
{
[super receiveAPI:notification];
self.m_productArray=[ProductsModel mj_objectArrayWithKeyValuesArray:notification.userInfo[@"products"]];
[m_producTabelView reloadData];
}
#pragma mark - UITableViewDataSource
- (NSInteger)tableView:(UITableView *)tableView numberOfRowsInSection:(NSInteger)section
{
return [self.m_productArray count];
}
- (UITableViewCell *)tableView:(UITableView *)tableView cellForRowAtIndexPath:(NSIndexPath *)indexPath
{
static NSString *CellIdentifier =@"ProductCell";
ProductCell *cell = [tableView dequeueReusableCellWithIdentifier:CellIdentifier forIndexPath:indexPath];
cell.delegate =self;
cell.tag =indexPath.row;
ProductsModel * productModel =[self.m_productArray objectAtIndex:indexPath.row];
[cell.m_iconImageView sd_setImageWithURL:[NSURL URLWithString:productModel.icon]];
[cell.m_productIdLabel setText:productModel.product_id];
[cell.m_productNameLabel setText:productModel.product_name];
return cell;
}
#pragma mark - ProductCellCellDelegate
-(void)btnAction:(NSInteger)index
{
SalesViewController *salesViewController =[self.storyboard instantiateViewControllerWithIdentifier:@"SalesViewController"];
ProductsModel * productModel =[self.m_productArray objectAtIndex:index];
salesViewController.m_ProductModel =productModel;
salesViewController.m_AuthModel =self.m_AuthModel;
[self.navigationController pushViewController:salesViewController animated:YES];
}
=============================================================================
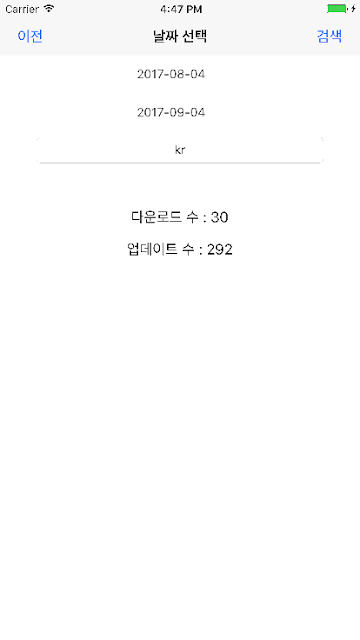
4.SalesViewController 에선 넘겨받은 product_id와 account_id 이용하여, Sales API 호출하고 결과를 테이블에 노출합니다. 기간을 선택할 수있는 컴포넌트를 추가하여, 파라미터로 같이 넘겨줍니다.
initView() : 시작, 종료를 선택할 수 있는 UITextfiled를 초기화 해줍니다.
seachAction() : 시작, 종료일을 받아 Sales API를 호출합니다.
receiveAPI() : Sales API 받은 결과를 SalesModel에 넣고, 테이블을 새로고침합니다.
dateAction() : 시작, 종료일이 선택했을때 호출되는 함수로 피커뷰를 띄우고 정보를 저장합니다.
=============================================================================
-(void)initView{
[m_tabelView reloadData];
DatePickerCell *endDateCell = [self getDatePickerCell:1];
NSDate *date =[NSDate date];
NSDateFormatter *formatter = [[NSDateFormatter alloc] init];
[formatter setDateFormat:@"yyyy-MM-dd"];
[endDateCell.m_dateBtn setTitle:[formatter stringFromDate:date] forState:UIControlStateNormal];
TextFieldCell *textField = [self getTextFieldCell];
[textField.m_textField setText:@"kr"];
}
-(void)backAction
{
[self.navigationController popViewControllerAnimated:YES];
}
-(void)seachAction
{
// #define SALES_API (accountId,productId,start_date,end_date,page_index) [NSString stringWithFormat:@"%@/accounts/%@/products/%@/sales?
DatePickerCell *startDateCell = [self getDatePickerCell:0];
DatePickerCell *endDateCell = [self getDatePickerCell:1];
NSString *startDate =startDateCell.m_dateBtn.titleLabel.text;
NSString *endDate =endDateCell.m_dateBtn.titleLabel.text;
if ([self isNull:startDate])
{
startDate = @"2017-04-14";
}
else if([startDate isEqualToString:@"시작날짜를 선택하세요"])
{
[SGAlertView alertViewWithTitle:@"알림"
delegate:self
contentTitle:@"시작날짜를 선택하세요"
alertViewBottomViewType:SGAlertViewBottomViewTypeOne];
return;
}
if ([self isNull:endDate])
{
endDate = @"";
}
TextFieldCell *textField = [self getTextFieldCell];
/// NSArray = [textField.textLabel.text componentsSeparatedByString:@","];
NSString *countries = textField.m_textField.text;
if (countries.length < 1)
{
countries =@"kr";
}
[self requestUrlGet:SALES_API(self.m_AuthModel.account_id,
self.m_ProductModel.product_id,
startDate,
endDate,
countries,
@"0") parameters:nil className:NSStringFromClass(self.class) apiName:@"SALES_API"];
}
- (void)receiveAPI:(NSNotification *)notification
{
[super receiveAPI:notification];
self.m_saleArray=[SalesModel mj_objectArrayWithKeyValuesArray:notification.userInfo[@"sales_list"]];
SalesModel *salesModel = [self.m_saleArray objectAtIndex:0];
[m_downLabel setText:[NSString stringWithFormat:@"다운로드 수 : %@", salesModel.units.product.downloads]];
[m_updateLabel setText:[NSString stringWithFormat:@"업데이트 수 : %@",salesModel.units.product.updates]];
}
#pragma mark - UITableViewDataSource
- (NSInteger)tableView:(UITableView *)tableView numberOfRowsInSection:(NSInteger)section
{
return 3;
}
- (UITableViewCell *)tableView:(UITableView *)tableView cellForRowAtIndexPath:(NSIndexPath *)indexPath
{
if (indexPath.row ==0)
{
// 시작 날짜
static NSString *CellIdentifier =@"DatePickerCell";
DatePickerCell *cell = [tableView dequeueReusableCellWithIdentifier:CellIdentifier forIndexPath:indexPath];
[cell.m_dateBtn setTitle:@"시작날짜를 선택하세요" forState:UIControlStateNormal];
cell.m_dateBtn.tag =0;
cell.delegate = self;
return cell;
}
else if (indexPath.row ==1)
{
static NSString *CellIdentifier =@"DatePickerCell";
DatePickerCell *cell = [tableView dequeueReusableCellWithIdentifier:CellIdentifier forIndexPath:indexPath];
[cell.m_dateBtn setTitle:@"종료날짜를 선택하세요" forState:UIControlStateNormal];
cell.m_dateBtn.tag =1;
cell.delegate = self;
// 종료 날짜
return cell;
}
else
{
// countries
static NSString *TextFieldCellIdentifier =@"TextFieldCell";
TextFieldCell *cell = [tableView dequeueReusableCellWithIdentifier:TextFieldCellIdentifier forIndexPath:indexPath];
[cell.m_textField setPlaceholder:@"국가를 입력해주세요(선택사항)"];
return cell;
}
}
-(void)dateAction:(NSInteger)index
{
if(index == 0)
{
// 시작
m_startPicker = [[SGDatePicker alloc] init];
m_startPicker.isBeforeTime = YES;
m_startPicker.datePickerMode = UIDatePickerModeDate;
// __weak typeof(self) weakSelf = self;
[m_startPicker didFinishSelectedDate:^(NSDate *selectedDate) {
NSDateFormatter *formatter = [[NSDateFormatter alloc] init];
[formatter setDateFormat:@"yyyy-MM-dd"];
DatePickerCell *datePickerCell =[self getDatePickerCell:0] ;
[datePickerCell.m_dateBtn setTitle:[formatter stringFromDate:selectedDate] forState:UIControlStateNormal];
}];
[m_startPicker show];
}
else{
// 종료
m_endPicker = [[SGDatePicker alloc] init];
m_endPicker.isBeforeTime = YES;
m_endPicker.datePickerMode = UIDatePickerModeDate;
// __weak typeof(self) weakSelf = self;
[m_endPicker didFinishSelectedDate:^(NSDate *selectedDate) {
NSDateFormatter *formatter = [[NSDateFormatter alloc] init];
[formatter setDateFormat:@"yyyy-MM-dd"];
DatePickerCell *datePickerCell =[self getDatePickerCell:1] ;
[datePickerCell.m_dateBtn setTitle:[formatter stringFromDate:selectedDate] forState:UIControlStateNormal];
}];
[m_endPicker show];
}
}
-(DatePickerCell*)getDatePickerCell:(NSInteger)index
{
DatePickerCell *datePickerCell;
for (DatePickerCell *cell in m_tabelView.visibleCells)
{
if ([cell isKindOfClass:[DatePickerCell class]])
{
if (cell.m_dateBtn.tag == index)
{
datePickerCell =(DatePickerCell*)cell;
break;
}
}
}
return datePickerCell;
}
-(TextFieldCell*)getTextFieldCell
{
TextFieldCell *textFieldCell;
for (TextFieldCell *cell in m_tabelView.visibleCells)
{
if ([cell isKindOfClass:[TextFieldCell class]])
{
textFieldCell =(TextFieldCell*)cell;
break;
}
}
return textFieldCell;
}
=============================================================================
결과 화면
 |
| 결과 화면 |


댓글
댓글 쓰기